Preparing & Circulating Property Management Agreement (PMA)
Process for Preparing and Sending a Property Management Agreement via DocuSign
Important: If this is an existing owner who already has a completed PMA, and we are just adding a new property to their account, then we do not need to sign a new PMA. We just need to sign a Multiple Property Addendum. Use this wiki instead: https://treaty-oak-property-management-llc.helpscoutdocs.com/article/283-adding-a-new-property-to-an-existing-owners-account
Preparing the PMA
1. Log in to ZipForms and click the new button to create a new transaction, and then click New Lease Listing.


2. Add the property address as a transaction name. Category: Residential and under Templates, select the 'Standard Property Management Agreement.' Click the save button.

3. After saving, we can see the summary page of the listing. Click on the Documents (highlighted yellow) button to open the documents. We will be needing the following documents.
- Residential lease & property management agreement
- Information about brokerage services
- Addendum regarding rental flood disclosure
- Addendum regarding lead-based paint (Only required if the property is built earlier then 1973, otherwise, do not include this document)
- Addendum to property management agreement
- Compensation agreement between brokers (It is not included in the PMA but will be needed when the property is leased)
- General Information for Landlord Regarding Assistance Animals
- Delete the rest of the documents

4. When we open the PMA form, some of the information is prefilled. Some of the information is filled by us, and the rest of the information is filled by the owner.
Information added by us on PMA
- Owner name, email and contact number (This information will be provided by the PM or OSM when the task is received.)
-
The OSM should be able to confirm this for you in the future, for all new clients. If needed, you may alternatively check the appraisal district website to confirm the ownership for the property. Currently, we manage in 4 counties within the State of Texas. Below is a list of websites where you can search the property and find out who the owners are and how their names are spelled, if necessary.
- Travis County: https://traviscad.org/propertysearch
- Williamson County: https://search.wcad.org/
- Hays County: https://esearch.hayscad.com/
- Bastrop County: https://esearch.bastropcad.org/
-
- Check the broker information. The address and the contact numbers.
- Add the property information from the MLS, including the 'Legal Description', the county, and the 'non-real-property items'.
- In the example below, the 'Legal Description' is LOT 53 BLK U SHADOWGLEN PHS 1 SEC 9
- Term: Commencement date and expiration date.

- Section 6J should state "Broker will hire legal counsel on behalf of the owner in the event of eviction."
-
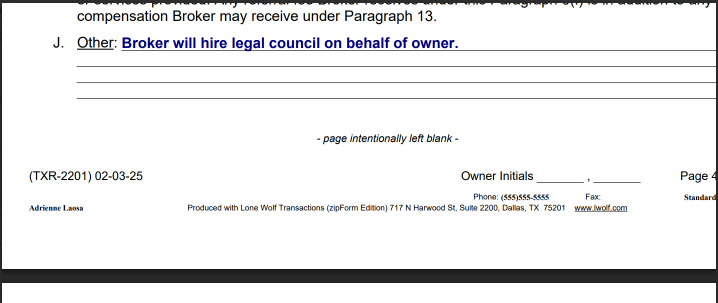
- The only verbiage that should follow Special Provisions is: "Broker will hire legal counsel on behalf of the owner in the event of eviction."


- Check the fee
- Management fee: 8%
- Leasing fee: 100%
- Renewal fee: $200

- Check the boxes that are required


- Check the broker information and owner name on page 16. Till this point, the PMA is completed. Click the save and back button to go to the documents page.
5. Click to open rental flood disclosure and make sure there's
- Property address
- A. marked as 'not aware' & B. marked as 'not aware' check boxes
- Landlord name
- Click save and back button to go to the documents page.

6. Download the PMA with all of the other documents in one PDF file to send for signatures.
Sending the agreement through Docusign
1. Log in to DocuSign
- Access your DocuSign account.
- Upload the finalized PMA document.
2. Apply a Template & add recipients
- Select the appropriate template if a pre-existing one matches the agreement type. Since we have a single owner in the below example, we will apply the PMA-2P template. 2P template means 1 signee will be the owner and 2nd signee will be the OSM. Similarly, PMA-3P means 2 owners and 1 OSM.

- Input the owner(s) and OSM names and email addresses as recipients.
- Use the "Signing Order" feature to ensure proper workflow:
- owners/landlords should always sign first.
- the OSM signs last
3. Add Fields to the Document
- Place the fields for the owner(s) to add the information, which is the mailing address and the contact information.

- Include initial fields on every page at the bottom for the broker and the landlord. If there is one landlord/owner, then they only need to initial once. If there are two landlords/owners, each one needs to sign + initial.
- Add the text fields on page 4 for the owner to provide emergency contact details.

- Confirm the placement of the fee (management, leasing, and renewal). Most of the time it's 8% management, 100% lease, and a $200 renewal fee.


- Add signature fields for the broker and the owner. Be sure to use the 'Date' tag in DocuSign. Don't manually enter the date using a text field.

4. Mandatory documents, which includes
- Lead-Based Paint Addendum (if the property was built before 1978).
- Rental Flood Disclosure (Included with every PMA)
- Addendum to property management agreement. Add the text boxes as shown below that allow the owner to complete these fields. Please also include optional text boxes for the utilities provider info.


5. Review and Send for Signatures
- Double-check all fields for accuracy and completeness.
- Click “Send” to distribute the PMA to the recipients for electronic signatures.
6. Follow-Up
- Monitor DocuSign for the completion status.
- Send reminders to recipients who have not signed within a reasonable timeframe.