MLS Entry + Taking Listings Live
MLS listings are super important, and it's critical to have the correct information on our MLS listings.
There are two ways to create a new MLS listing:
- filling from a previous listing (ideal)
- filling from tax records
Note: There are two views on MLS. The process below uses the "New" view. To switch to this view, use the toggle in the top right of MLS.

Follow the processes below.
Option A: Filling From a Previous Listing
First, we always want to check if there's a previous listing we can fill from. This will minimize our workload, as the listing details will be mostly accurate and we can just copy them from the last listing.
If you need to find a previous listing, just copy & paste the property address into the search bar. You may need to delete the street designation such as “way, road, ave”, etc. The search bar is a little picky, so you might have to try some variations of the property address.
Once you’ve pulled up the properties, look for the most recent listing. Search for whichever listing has the most recent ‘Close Date’ as shown below.
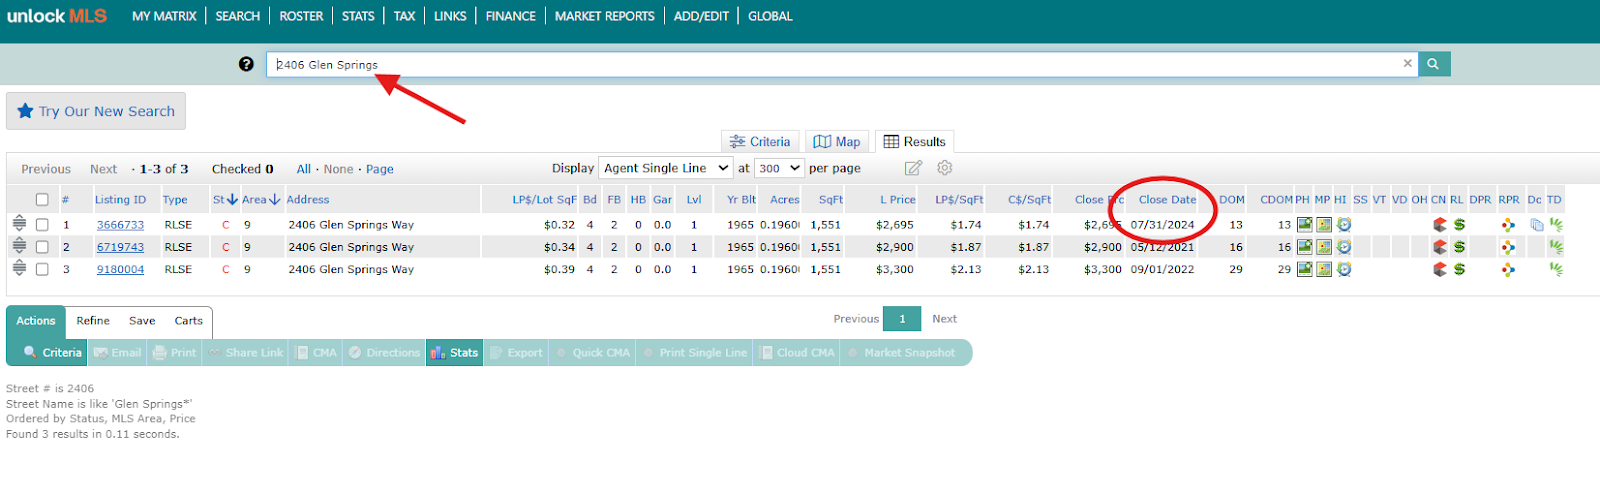
Then, click the “Listing ID” on the left to pull up the full listing.
Here, you can see the full listing. Just review it to make sure it’s all good information, and that the listing has photos.
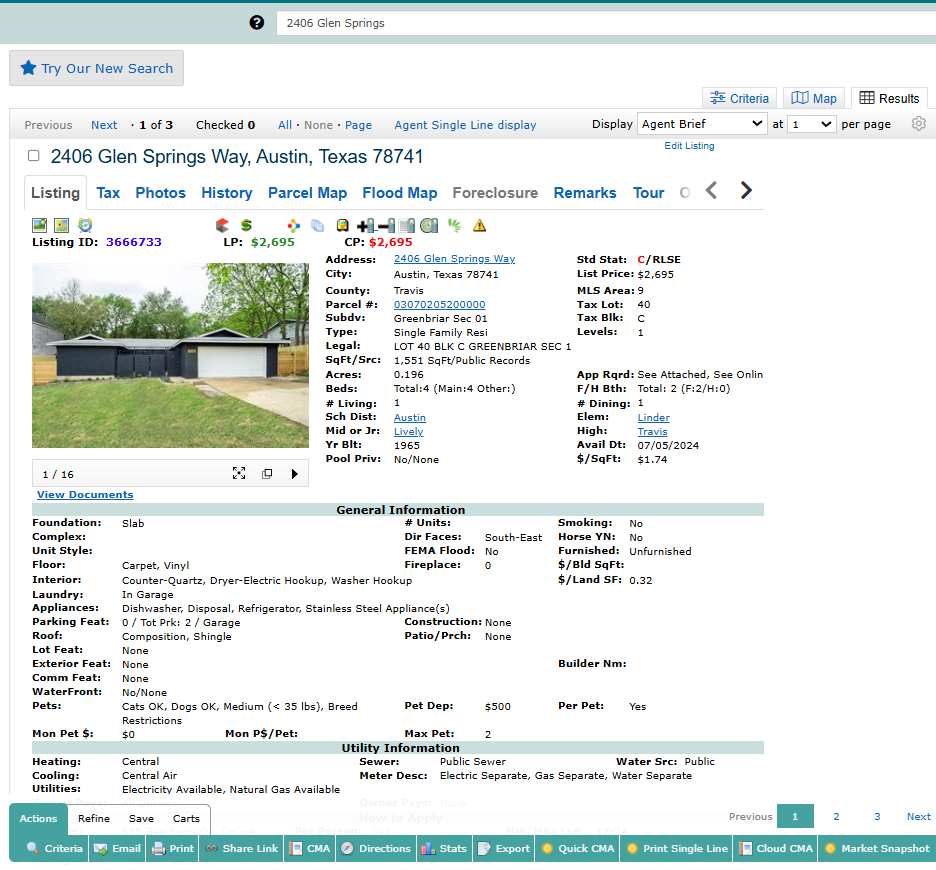
Scroll down and check the Listing Agent section. If it's someone at our office, then you can be confident the information is good (but you DO still need to check the listing details to ensure they match the 'Listing Info' section below).
Please note that if it is NOT someone at our office, you CAN still fill from this listing, but you will need to be aware of a couple of things:
- The listing details may not be correct and you must scrutinize the information more closely
- We likely don't have permission to use their photos. In this case, we need to use our own photos. You can find these in Appfolio. If they are not in Appfolio, contact the PM.

Once you’ve determined this listing is good, then copy the ‘Listing ID’ (in the example above, this is 366733), then proceed to the next step of adding a new listing from a previous listing.
To add a new listing from a previous listing:
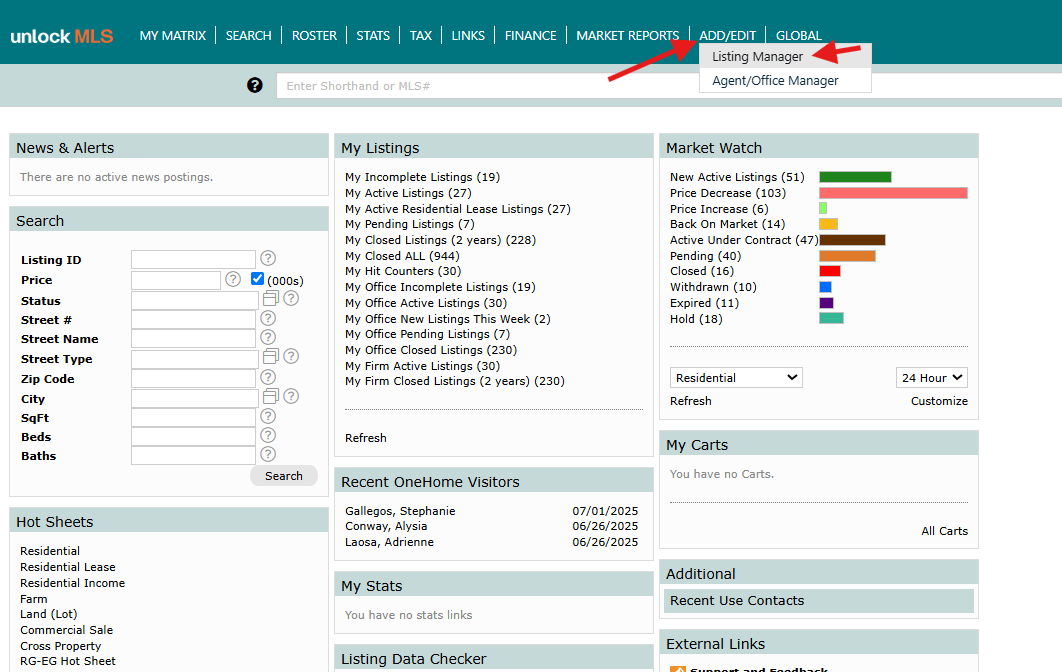
First, hit ‘Add/Edit’ and select ‘Listing Manager’.
Then, hit ‘Add’ and select ‘Residential Lease Input Form’ from the Dropdown.

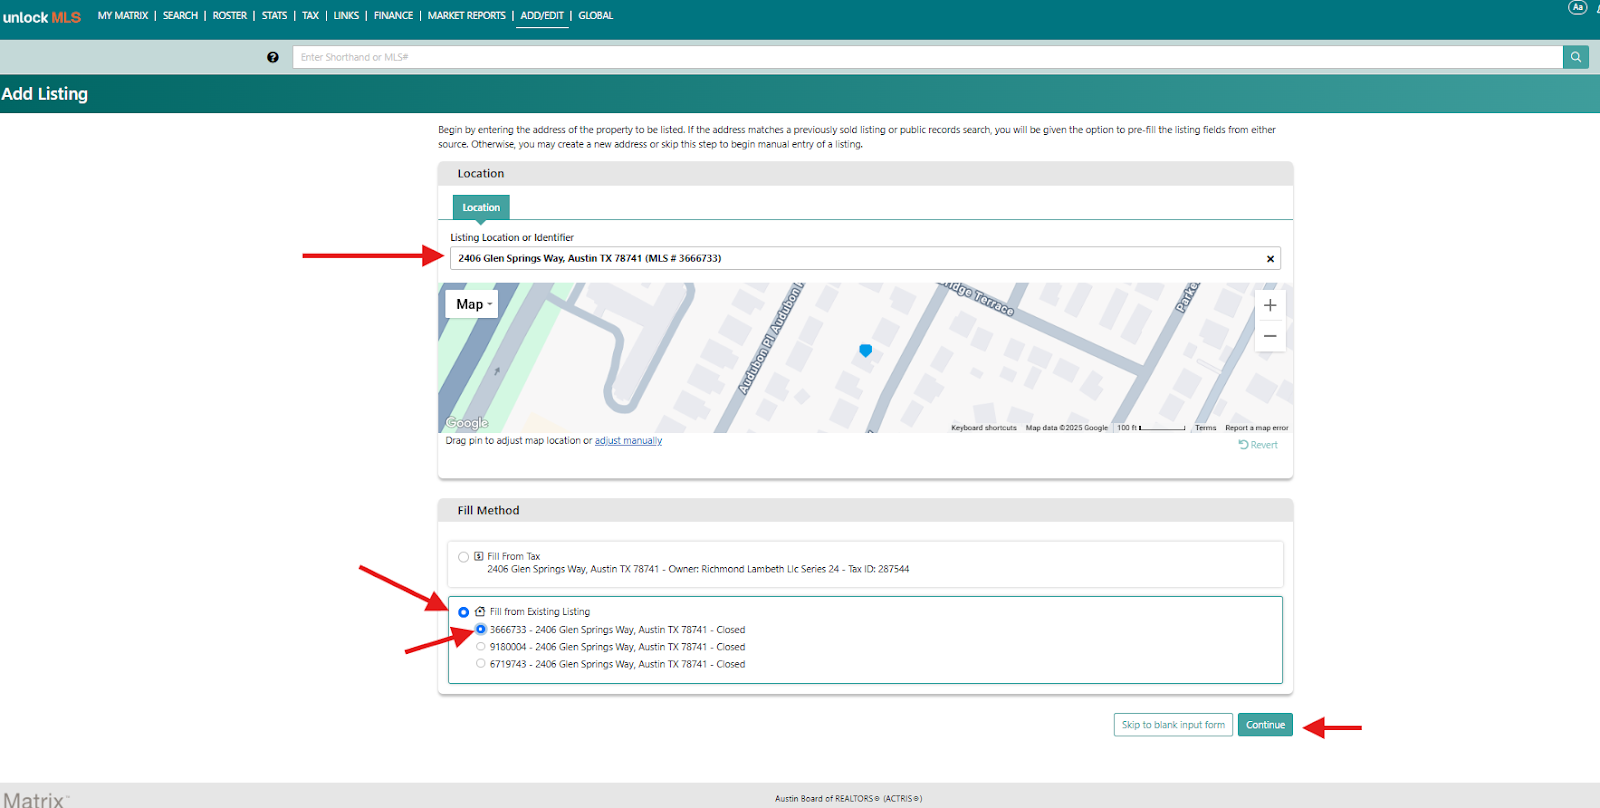
Search the property address. Then click ‘Fill from Existing Listing’, and select the one that matches the Listing ID you grabbed earlier. Then click ‘Continue’
You may then proceed with completing the listing.
Option B: Filling from tax records:
If there is not a previous listing we can fill from, then you need to fill from tax records.
Click ‘Add/Edit' then 'Listing Manager' from the dropdown.

Click 'Add' on the right, then select‘ Residential Lease Input’ form
Search the property address, then select 'Fill From Tax', and then 'Continue'

This will make a basic listing. Then, you'll need to collect the property information from various sources
- Look at the property photos
- Check PMA for info on appliances included
- Reference 'Listing Info' below for other general info.
Listing Info
- List Agreement Type: Exclusive Agency
- List Agreement Document: TXR
- List Price: Leave this blank for now. You need to wait for final price confirmation from the PM. Typically, you won't receive the final price confirmation until the day before the listing, or until on the day we are listing. It is impossible to take listings live without a list price, so leaving this field blank also ensures we do not accidentally take the listing live.
- Expiration date: Set for 1 year out from projected list date. **Important** Make sure the date is set for about a year out. The month/day does not need to be exact, but we do need to make sure the year is correct so that the listing doesn’t expire.
- School District/Schools:
- If copied from the previous listing, leave school info as-is.
- If filled from tax records: Open a separate window for Matrix and search for a previous listing of the property, or the most recent listing of a property on the same street, and copy the School District & school names.
- Latitude/Longitude: Click ‘Get Lat/Long from address.
- Housing Vouchers: No
- Property Sub Type: Select the type of property
- Bed/Bath: Add main level & other bedrooms. Add full & half bath
- Garage/Parking spaces: It can be checked from the photos.
- Year Built: This should automatically populate from tax records, but if it does not, enter 'Resale'.
- Living area: Auto-populate
- Living source: Auto-populate
- Directions: Check the property facing through Google Maps
- Property level: Auto-populate
- Living/Dining: Auto-populate from the previous listing or confirm with the PM. Check photos
- Smoking Inside?: No
- Refrigerator?: Yes
- Appliances Maintained: None
- Horse Amenities: None
Check the marketing description
- Appliances: Check the marketing description & kitchen photos for appliances
- Exterior Features: Select yard or else none
- Parking Features: Check photos
- Fencing: Check the exterior photos
- Interior Features: Check the interior photos and also the marketing description
- Patio and Porch Features: Check the marketing description or select none
- Window Features: None
- Laundry Location: Check the photos for W/D availability & location.
- Accessibility Features: None
- Private Pool Features (On Property): None.
- Note: Sometimes you may see a pool in the photos. Often, this is in fact a "Community Pool", i.e. it's a shared pool that the entire neighborhood has access to. Community Pools should NOT be listed under 'Private Pool' features. Private Pool = the pool is in the backyard of the home. Most homes do not have private pools.
- Security Features: None/check the marketing description
- # Fireplaces/Location: Check the interior photos
- Community Features: Check the marketing description else none
- All other options check none
Documents, Utility, and EES Information
- Disclosures: None
- Owner Pays: None
- Tenant Pays: All utilities
- Documents Available: None
- Meter Description: Select electric, gas & water seperate. Confirm with PM or check the property page for connections
- Heating: Central
- Cooling: Central
- Utilities: Electricity Available, Natural Gas Available
- Sewer: Public
- Water source: Public
- Application Fee: $75
- Per Person: Yes
- App Fee Payable To: See Remarks, Online
- Available Date:
- 1. If this is a vacant property, set the 'Available Date' to the same day you list. E.g. if you're listing it on 7/17, then available date should be 7/17. 95% of the time, properties are vacant.
- 2. If this is an occupied property, you'll need to ask the PM to provide this information. Occupied properties are rare.
- Application Required: Check 'See Attached' & 'See Online App'
- Application Policy: Best Qualified Application
- Security Deposit: Leave this blank for now. You will enter this on the day we list, based on the PM's final price confirmation.
- Sec Deposit Payable To: See Remarks
- 1st Month Rent Payable To: See Remarks
- Certified Funds: Yes
- Managed By: Property Manager
- Renter's Insurance Required: Yes
- Lease Guarantor?: Yes
- Minimum Lease Months: See 'How to Show and Information / Showing Information' section below.
- Maximum Lease Months: See 'How to Show and Information / Showing Information' section below.
- One Time Expenses: 'Application Fee'
- Pets Allowed: Cat & Dog
- Number of Pets Allowed: 2
- Weight: Medium <35 lbs
- Check Breed Restrictions
- Pet Deposit: 500
- Per Pet: Yes
- Monthly Pet Fee: 0
- Owner Contribution: Leave Blank
- Rent Spree Online Application: No
- Leave the rest blank
- On-Site Compliance: No
- Intermediary: No
- Access Code: Typically this is a 'Gate Code' or building code. Check the 'Notes' section of the Appfolio listing to see if there is a gate code. If there is, then paste it into the 'Access Code' section. Most properties do NOT have an 'Access Code', so most of the time you'll leave this blank.
- Showing Instructions:
- If the property is vacant, check ‘Vacant’. Check ‘See remarks’. Never put 'Go'. We want to force agents to have to read the remarks with all app instructions.
- If the property is occupied, check 'Showing Service' &‘See remarks’. Then check with the property manager on the showing instructions.
Information for 'Agent Remarks' section:
Application + Approval Guidelines at this link: https://bit.ly/2QN8BG3 - Must Review Approval Guidelines in attachments. Showing Instructions: {{SHOWING INSTRUCTIONS}} - Please review instructions in the link before contacting w/ any questions. After reviewing the link & approval guidelines, please email any questions to info@treatyoakproperties.com. Maximum weight allowed for the pet is 35 lbs. All of the leases must expire on the last day of March/April/May/June {{YEAR}}.
We always align lease end dates to land in the strongest rental months (Mar–Jun) even if it means a longer first term—that boosts rent, cuts vacancy, and streamlines operations. We have a minimum lease term of 12 months.
Use the following rule to determine what to enter into the 'Agent Remarks' template above:
- If this property is listed between Jan–June→ Write “Lease must expire Mar/Apr/May/Jun {{next year}}.”
- If this property is listed between July–Dec → Write “Lease must expire Mar/Apr/May/Jun {{year after next.}}”
Please be sure to also update the 'Minimum Lease Months' and 'Maximum Lease Month's section to match what you input into the Showing Instructions. You may use ChatGPT to help calculate the # of months:

Examples (assume lease starts the same month you list it):
| List Date | Term Chosen (approx) | Expiration Remark |
|---|---|---|
| Feb 10, 2025 | ~14 mo | Lease must expire April-June 2026. |
| May 1, 2025 | ~13 mo | Lease must expire April-June 2026. |
| Jun 20, 2025 | ~12.5 mo | Lease must expire April-June 2026. |
| Jul 5, 2025 | ~20 mo | Lease must expire April-June 2027 |
| Sep 1, 2025 | ~18 mo | Lease must expire April-June 2027 |
| Dec 15, 2025 | ~17 mo | Lease must expire April-June 2027 |
Please watch this loom if you need more context.
Please note that 95% of the time, our properties are "Vacant", so showing instructions should be "Vacant - Go"
Important: ShowingTime is ONLY used for occupied properties. 95% of the time, properties are vacant, so 95% of the time we will not need to configure ShowingTime instructions.
- Never put tenant contact info in agent remarks. We want to force the agents to have to use ST to schedule.
- Access Instructions: Key in the lockbox
- Lockbox type: Supra Lockbox
- Lockbox location: Door-front
- Management Company: Treaty Oak Property Management, LLC
- Management Company Phone: (512) 504-7414
- Occupant:
- If vacant, select ‘Vacant’.
- If occupied by the owners, select ‘Owner’. Then enter (555) 555-5555 in the ‘Occupant Phone’ section.
- If occupied by tenants, select ‘Tenant’. Then enter (555) 555-5555 in the ‘Occupant Phone’ section.
- Leave the other fields blank/as-is
- Invoice Submission: See Attachment
- Commission Paid: See Attachment
- Sub Agent: %
- Sub-Agent Amount: 0 **Important: Make sure this field is correct**
- Lease Agent: %
- Lease Agent Amount: 30 **Important: Make sure this field is correct**
- Leave the rest blank
- Directions: Pull up Google Maps & enter the property address. Find the fastest route from the nearest major highway. Copy & paste the text directions that Google Maps provides.

- If there is an old listing, you can also just copy the directions from there. Please be sure to clean it up to look like the following example.
- Example: I-35 to 3406 exits or East Old Settlers Blvd, right on Champion Dr, right on Collie Path, right on Deerhound Pl.
- For private, public, & syndication remarks:
- Add the marketing description provided by the PM in the marketing email.
- If the PM did not provide a marketing description, you may check the old MLS listing or the Appfolio listing. IMPORTANT: Please review the marketing description to make sure it is still accurate. It's VERY likely something is incorrect; we often make changes to properties (replacing appliances, replacing carpet, etc), so it's common we need to change the descriptions.
- Do not add any compensation offer in these fields.
- Important: If you notice anything that appears to discriminate against protected classes of individuals or otherwise appears to be violating Fair Housing Laws, please flag it to the PM. Review this wiki for info on fair housing laws.

- Under Internet Display, check the following:

Uploading Photos
- Note: We have a limit of 40 images, so if the pics folder has 40+ shots, run through and remove any duplicate/unnecessary shots. Most of the time, we can remove extra shots of living rooms, kitchens, backyards to meet the maximum. Ask the LC if you’re unsure which to pull.
- Before posting photos, please review them:
- 1. Check for any photos that look bad. Use your best judgment; if you see something (for example if the photographer tracked dirt in on their shoes), then go ahead & remove the bad photos.
- 2. ensure that the photos are in order as if you were touring the home. You walk through the kitchen and living areas first, followed by the primary bedroom, bathrooms, bedrooms, office, laundry, then backyard. It's best to place them in order on the folder on your computer; that way, you can upload them to MLS and Appfolio and they'll be in the correct order.
- To upload photos, go to Add/Edit and find the listing
- On the ‘Modify Listing’ page, select ‘Manage Photos’
- Note: If you have filled from an old listing and we are reusing the old photos, you can click 'Fill from Listing' and MLS will autofill from the old listing. Reminder: If this property was listed by an agent who is not with TOP, we probably don't have permission to use their photos. Check with your PM if you're not sure.
- Click ‘Browse’, find all of the shots you’re uploading, and upload them to the listing. Once they’re uploaded, if you need to rearrange anything, you can drag images around. Make sure the best exterior image is the first in line, as that will be the main image in MLS & the syndicated listings. Ask the LC if you’re not sure which shot to use.
- When you’re finished, click ‘Save’, then check over the listing to confirm the pictures have uploaded.
Add application criteria doc to the MLS docs
On the MLS page, select the 'Documents' tab.

We need to make sure the most recent copy of "Treaty Oak Application and Approval Criteria.pdf" document is uploaded. If it is not, click the "Edit Listing" > Click "Edit" again then you should be able to see this option "Upload Documents"


Taking TOP Listings Live
Once the listing make-ready has been completed, property has been cleaned, and the PM has confirmed final price, we need to take the MLS listing active, then update several supporting systems.
- Confirm all of the info on the listing is accurate.
- Enter List Price: We'll want to always wait for a final confirmation on the price from the PM. Usually, we won't get that final price confirmation until the day of the listing; agents/PMs very frequently wait until the very last minute to make a final pricing decision. This helps ensure they get the most accurate pricing decision based on the most recent comparable properties. If you have not yet received the final price confirmation, or you are unclear what the price should be, then just email the PM. They will appreciate you being thorough!
- Early Lease Termination: When listing a property for lease during an early lease termination, the list price should be the same rent as the existing tenant is paying. You can determine this by reviewing the tenant's page in AF and reviewing the most recent lease addendum. You will also note the specifics outlined in the addendum and ensure they're pasted in the property notes for the next lease that is put together (re: utility payments).
- Enter security deposit amount: This is almost always equal to the list price.
- E.g. if list price is $1500, security deposit is $1500.
- Especially check to confirm the security deposit matches the final list price, confirm washer/dryer read 'No', available date, and confirm access/showing info is correct. Make sure pics are uploaded and in order, and that copy is noted on all 3 fields, with the correct showing & application instructions noted on 'Agent Remarks'.
- Once you're 100% sure all the details are correct, click 'Publish Listing'

- Then, go to the listing page and confirm the listing status is ‘A’/’Active’.

Note: If we are listing multiple units at the same property (for example, we are simultaneously listing Unit A and Unit B of 3301 Dalton St), MLS may give you the following error:
When this happens, it's because the 'Parcel ID' is identical to an existing listing. When this occurs, just add 'Unit B' to the second listing's Parcel ID. For example:
- If Unit A PID = "041727312000"
- then, edit Unit B's PID to = "041727312000 - Unit B"

Grab a 'Live Listing' link
Next, we need to grab a shareable link so we can send this listing to the PM for review.
At the bottom of the listing, click the 'Share' button, and copy this link.

Send the below email to the property manager
|
{{PM FIRST NAME}},
This listing is live, can you please review and let me know if any changes need to be made?
MLS Listing Link
Website Listing Link I am setting up Supra, as well as posting to the internet and Available Properties page in just a moment.
Thank you! |
Post to internet and website
Log in to Appfolio and locate the property. If this is a multi-unit property, be sure to select the right unit.
First, make sure the Appfolio listing has photos uploaded. If we've ordered new photos, please go ahead & swap in the new photos and delete the old ones.
Then, on the right-hand panel, click 'Post to Website' and 'Post to Internet'.

Then, wait a minute or two, and click this link. https://www.treatyoakproperties.com/available-properties
Search for the property to confirm it's appearing on the Available Properties page. If it is, then you're done with this step.

Set up Supra
Supra is a system for managing the lockboxes we place at properties. It allows us to track when agents enter the property. We need to assign the MLS listing number to the lockbox, so that we can gather feedback from agents.
For this, first you'll need to find the number for the Supra lockbox associated with this property.
Pull up the Vacancy Spreadsheet, find the property, and the Supra box number is found here:

If the supra lockbox information is NOT present on this sheet, then log in to SignOtter, locate the property, and you should find the Supra # there.
Then, log in to Supra using Adrienne's credentials (found on the TOPM Important Info Sheet)
Once logged in, click 'Listings', then click 'Assign Listing'

Search for the lockbox # from the dropdown menu and click it.

Copy and paste the MLS number here, then click 'Assign'. Then you're done!
What if I can't find the lockbox number?
If the lockbox does not appear in the dropdown menu, click the 'Listings' tab and search for it there. You will be able to search lockboxes that are already assigned to an MLS listing.
In this example below, 6203 Spicebrush is a listing that we already leased a month ago, we just didn't remove the lockbox. When this happens, you'll want to:
- Check MLS to make sure this is NOT a live listing
- After confirming it is not live, click the lockbox number, then click 'Listing Details', and swap in the new MLS number.

Adding to ProAgentSolutions
Next, we need to add the listing to 'ProAgentSolutions', which is a system we use to automate feedback requests from agents that show our properties.
- Log in to https://agent.proagentsolutions.com/ (login credentials are on the Important Info sheet).
- Click the 'Listings' tab, then 'Manual Entry'
- Enter all the key property info (bed, bath, price, etc). You can copy and paste most of it from MLS
- Ensure the correct lockbox is added. If the lockbox is not already added to PAS, here's how to sync it: https://secure.helpscout.net/docs/682c98b85b07a90ce479dbc9/article/68910929e0989a6b64331b1c
- Hit 'Save', then you're done!
Update Vacancy Spreadsheet
Lastly, pull up the Vacancy Spreadsheet, and change the listing status to 'ACTIVE'.
(Later, once the property is leased and the tenant has moved in, the Maintenance Coordinator will remove it from the spreadsheet.)
ShowingTime (Only for Occupied Properties)
Note: 95% of the time, our properties are vacant, so 95% of the time we will not use ShowingTime.
If the property IS occupied, please ping Alex for support on configuring ShowingTime.
Correcting Errors on the List Price
Sometimes, we make a mistake and enter the wrong listing price. It happens!
The important thing is that we 1. fix it immediately and 2. we don't repeat the mistake.
If you entered the wrong amount in the 'List Price' section, we need to contact ABoR to fix it. Do NOT update the price on the MLS listing via the editor.
The reason we contact ABoR to fix it (rather than just editing the price in MLS) is that when we change the list price on a live listing, the MLS system records it. So, it looks like we raised or lowered the price after listing. This can mean
1. agents who look at the listing think we reduced price due to a lack of interest (meaning they will try to negotiate it even lower)
or
2. they think we raised price for some other reason, and then they bug us with silly questions.
So, we must contact ABoR by email to have them update it on their end. When ABoR updates it, there will be no record of a price change at all.
Simply send the following email template to support@abor.com, and CC the PM (or whoever the listing agent is).
Subject Line: 710 Arrow Point Dr #16, Cedar Park, Texas 78613 - Price Error
Hello!
I am reaching out on behalf of {{PM OR LISTING AGENT FULL NAME}} (CC'ed here), listing agent for {{PROPERTY ADDRESS INCLUDING CITY, ZIP}}.
{{LISTING AGENT NAME}}'s agent ID is {{LISTING AGENT ID}} and the MLS ID is {{ENTER MLS ID FOR THIS PROPERTY}}.
We made an error and listed this property incorrectly at the price of ${{INCORRECT PRICE}}. Could you please update the price to ${{CORRECT PRICE}} at your earliest convenience?
Thank you so much in advance!
For reference, you may find the listing agent's ID as shown below:
